Welcome to my blog!

I used to blog here mostly using local photos about my neighborhood or Washington DC or other places I visited. But over time I found myself blogging about crafts or sewing projects or my activities as a seller of collectibles on Ebay (look my stuff up under Mugsim7) or other topics, such as selling my beautiful old Victorian townhouse. Occasionally, I take a break from blogging so you won't see anything regularly. But I'm still have fun writing it. May your days be blessed with miracles, and creativity too!
Showing posts with label sewing. Show all posts

Tuesday, July 28, 2020

Thrift shop find makes nice summer dress

This lovely blue dress I got for a few dollars in the local Goodwill Thrift shop last year.  And, inspired by the Refashionista , I fidgeted with it on the sewing machine and this is how it ended up!  Unfortunately, I forgot to take a photo of what it originally looked like!          But it had blousy elbow-length sleeves, hung down to around my ankles and was way too wide or basically hideously hanging on me.   It was probably a Medium size and needed a slash down from me.  But I loved the almost periwinkle blue color and its pattern, the V-neck, the shiny shell like buttons and how light and summery the fabric felt.  So I chopped the sleeves and made them into little cap sleeves, took in the side seams about an inch each and hacked about 6 inches off the hem.  That piece I turned into a belt that you can see tied around the waist.  I think it came out all right!   It's easy to wear in the summer heat and washes and dries quickly as the fabric is some sort of light weave. 

Monday, July 20, 2020

Summer Bed Cover From Old Embroidered Handkerchiefs

I'm not sure I wrote about this sewing project already but since it's summer and I've put this back on the bed it's worth explaining.  When we cleared out my mother's house when she died, I came across a stack of handkerchiefs that were very pretty and embroidered.  It turns out a lot of these handkerchiefs and small table mats that had been embroidered by my father's sister, my Aunt Margaret, so I decided to keep them with the idea of using them in a crafts project. Some of the handkerchiefs in the stash also had manufactured embroidery on them but also were very pretty, so I kept them too.  I googled some Pinterest projects involving old vintage handkerchiefs and decided to lay them all out on the ground to see if they suggested anything.  So I realized I had quite a few pieces and that I could use them as decoration on a bed coverlet. I had a fine linen sheet from my mother-in-law that was a one-of and so it was perfect for this project.
 It took me a long time to actually piece and lay out all the handkerchiefs.  I pinned them out and then steadily worked my way through stitching them down.  This took quite a while as it was hard to manage a big sheet on my sewing machine which is not one really designed for large projects like this.  But I finally finished it and felt quite proud of myself for recycling,  and reusing these items.  And it's a very practical and light summer bed cover as well!


Sunday, April 19, 2020

Another Recycled Quilt from Shirts And Curtain Fabric

 This quilt was the inspiration for another one I wrote about recently as it was my first foray into using old shirt material to make the squares and triangles that make up the design for this quilt.  The old shirts were from my son and husband and had accumulated in my fabric stash and were just crying out to be used for something.  I also used some old curtain fabric -- the satiny brown fabric -- for the side striping that finishes off the design.  And I used a piece of old flannel sheeting for the backing. You can tell that I'm a bit of a hoarder when it comes to bits of fabric!

Again, I used the fast triangle sewing technique to make up the squares pretty quickly.  If you are working really fast, and a bit slapdash like me, you can skip using the ruler and pencil and just eyeball sew it.  When I cut the squares out, I use a 5" by 5" square piece of cardboard as a guide for the size of each square.  After making as many squares as you can generate from your fabrics, it's time to lay it out and see how you can arrange them in different ways.  This particular design (the blue and orange plaid squares) is called a windmill design and it's easy to do if you just lay them out ahead of time and turn the squares in the right way.  I take my time with designing these, and in this case it was a full week before I had it figured out!
 Once I put the larger squares together it was time to join them together with strips of grey plaid shirting and then finish it off with the bronze edging.  I also stitch-in-the-ditch in a few areas, to join the top piece to the bottom, once I've joined the flannel back to the designed portion. But I don't quilt all of the top to the bottom portion as I like my "quilts" looser.
Lest you think I sew this up in a day or so let me tell you that this type of project can take me several months to complete. I may just cut up the shirting fabric scraps one day. Another day cut them in the 5 inch squares.  Another day stitch the triangles, and yet another day to lay it all out. And yet another day or week to put the surrounding strips on.  The backing on this quilt project was some leftover flannel sheeting I had and that gave it a nice soft feel. I didn't use batting to fill it but I could have used some old blanketing or another layer of flannel sheeting had I wanted this to be fatter and warmer.  I just left it this way, essentially two layers of fabric.  It's just great to tuck around me when I'm reading in bed -- as it's about 4 foot by 4.5 feet wide, and I didn't want something too big.  This size makes for a great lap quilt for keeping you warm watching TV on the couch too and is a size that folds up neatly and can be easily stored nearby where you might use it. Everything was scrap fabric so again I felt virtuous upcycling, recycling and reusing all these bits of fabric that were piling up in my fabric stash.


Quilt Made During Pandemic: Recycled Shirts

Well, I pulled together a lap size quilt this past week from some old bits and bobs of fabric I'd been accumulating.  Most of the scraps were cut out pieces from old shirts from my husband and son. They are pretty hard on their shirts and once I can no longer sew the rips in the seams or shoulders or the tears that can't be patched, I cut up the shirts, open up the sleeves, etc.  Then I cut out 5 inch squares and start making a quilt.  I think this quilt is made from about five shirts, although I have scrap squares left over that I will turn into something else. Maybe a pillow....
One of the ways I have speeded up sewing quilt squares into triangle shapes was one I learned from a television show on sewing called "Sewing with Nancy" that I stumbled upon one day. Who says you can't learn from watching TV?
Anyway, to really make triangles fast the method is to get your two different squares sewn together fast by sewing two different squares together by putting the two right sides together and then stitching diagonally across from one corner to the other. Then you sew
a seam either side of that diagonal, about 1/8 inch away, so you end up with three seams running diagonally corner to corner.  Then you just snip through and across the middle seam, that is, the middle diagonal line of stitching, and hey presto, once you open it up, you have two squares made of two different triangles stitched together.  You just press them out then arrange them in rows, and then sew it up!  I try to make the whole thing as geometric as possible.  Usually, I bind the edge with strips of left over material sewn together to finish it.
I'm not the neatest sewciopath but over all, I'm usually pretty happy with how these come out.
And for the batting inside I used an old blanket piece, attached that to the patterned side of the quilt and then put on the backing (which was made up of discarded T-shirt material, so very soft and cottony) and then stitched it all together and turned it right side out (left about a foot unstitched so I could turn it right side out.  Then hand sewed that final foot and pressed the whole thing.  And eh voila, a lap quilt for keeping knees warm when curled up on the sofa watching tv or when reading in bed and when you don't or won't need a full size blankie. And it's all reuse and recycle or upcycle, and I feel virtuous that I didn't fill up the landfill!


Thursday, February 9, 2017

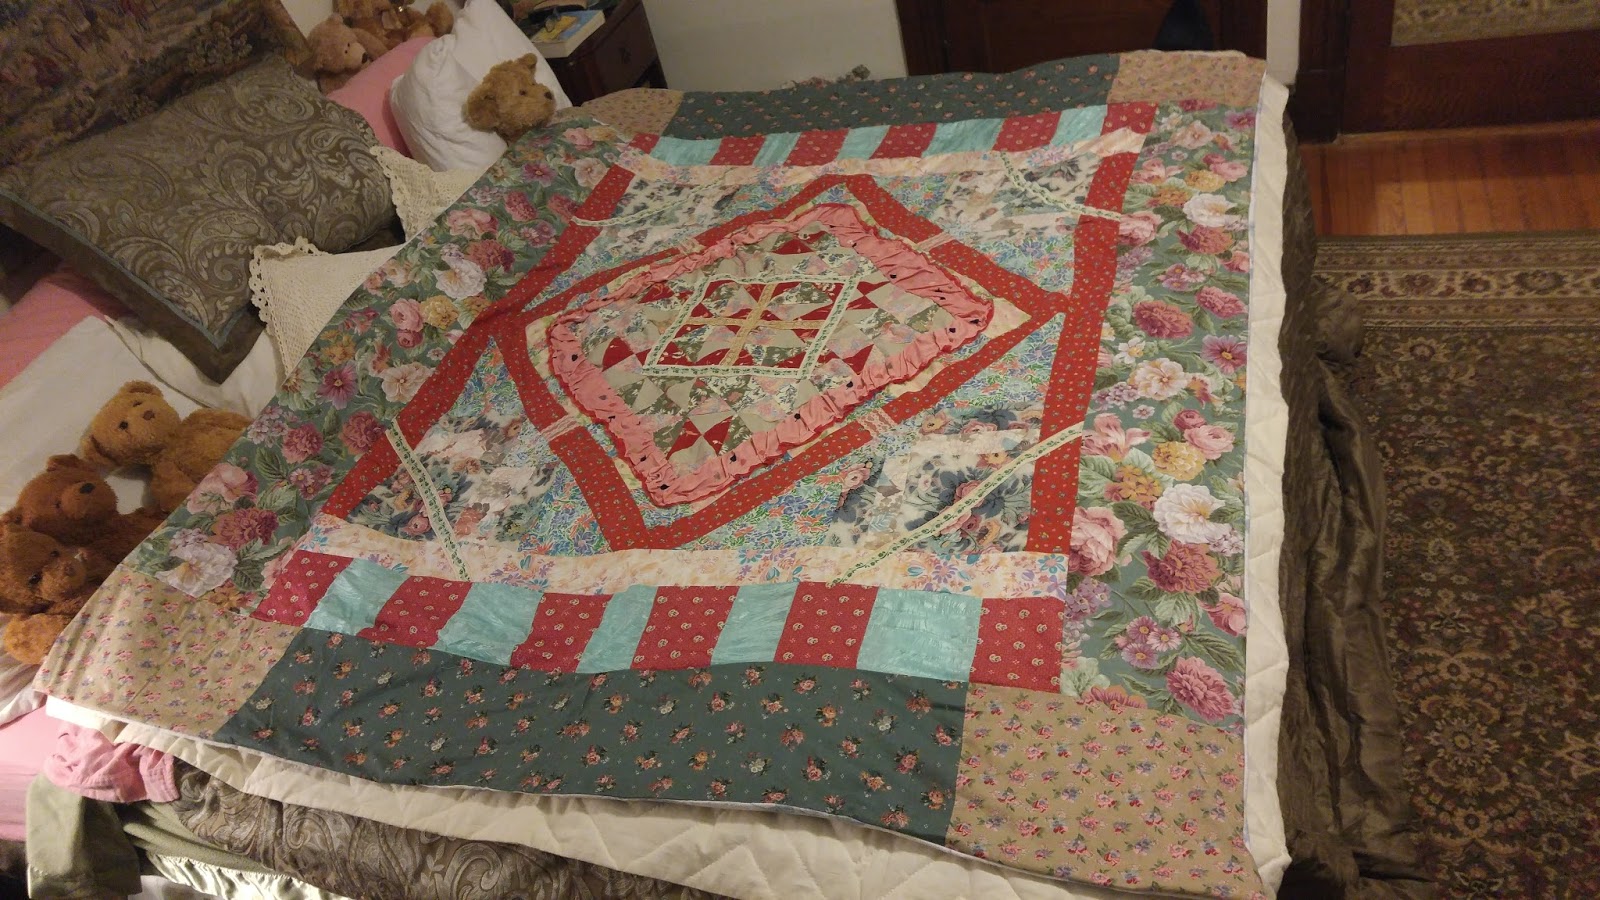
Crazy Quilt Finally Finished After Ten Years

Close up of central ornamental part
Full view on the bed.
I finally finished a quilt that I started over ten years ago. It is made of scraps of fabric and ribbon and bits of found lace that I stitched together at odd times over the years. It was sitting in my stash of "unfinished sewing projects" for way too long. About a year ago (!) I got the final pieces seamed together along the edges and this week I stitched on a backing. This was an old flannel sheet with a pretty floral design on it that I got for $3 at the Salvation Army Family Store and that makes a nice warm cozy back to the quilt top as I decided to forgo inserting batting between the two layers of fabric.  I was inspired to finish this by watching a PBS TV show recently -- Sewing with Nancy -- on making quilts where Nancy (Zieman) showed how to make perfect squares and triangles and how to arrange them for classic quilt designs.  Well, my quilt is not like that but more along the lines of a 'crazy quilt' in terms of design, as crazy quilts are basically easier to make as you kind of make them up as you go along which is how this quilt got made!  I recycled an old loose weave cotton knit blanket on the inside as the "batting" and added a full size flannel sheet for the underside.  It's large enough that the quilt can lie on top of a king size bed or can hang over the edges on a smaller bed.  It's mostly pinks, reds, greens and a lot of floral bits with some lace and ribbons and a stitched down ruffled part in the center, so the overall effect is on the "feminine" side. I've done some stitching in the ditches, but not completely throughout the quilt.  I'm thinking I might sell this quilt if someone makes me an offer and I can bear to part with it!


Tuesday, July 12, 2016

Blue Jean Leftover Fabric Becomes Boys' Room Banners

It was fun using up the leftover blue jean fabric scraps to make banners for two boys' bedrooms. For each letter, I created a simple triangle-shaped pattern and stitched down the sides and created a casing at the top.  I then cut out the letters in a contrasting fabric, tracing them first on the fabric, and overstitched them with zigzagging onto the triangle-shaped pieces.  The "cord" holding the banner pieces together is made from the thick leg seams and threaded through the casing with a large safety pin.  I then just thumb tacked these to the walls!  Depending on the number of letters in the name, you can run these up in less than two hours.


Thursday, July 7, 2016

Pillowcases become Little Girl Dresses

Well, these are the last two little girl dresses I made out of pillowcases and by now I had got the drill down fast. First I dyed the pillowcases and after drying cut the fabric. Cutting is simple as I'm just snipping off the top about 6 inches so I can make the ribbon that goes through the neckline casing. Then I cut out the armholes and use those pieces to make the top stitched pockets on the front of each dress. Since these were one seam pillowcases, I put that seam down the back and angle seamed the sides so the dress would flare a bit at the bottom. Then I stitched on embellishments -- in this case some silver ribbon made from a hem I'd hacked off another dress. The yellow lace was left over from a table cloth I'd cut up another time (as it was all torn up except for the lace bits). Then I do the neck casing, about an inch and a half and then, after making the ribbon for the casing, I thread it through and make a bow for the shoulder.
I think I've now got the drill down to about 45 minutes per dress (not including the time to dye and wash and dry). There's tons of tutorials on Pinterest and in various blogs if you need a pattern for making these, just search away!
While I'm sewing these, I stay praying for the girls that will hopefully receive these. I think about how the dress will go with their personality and fit them properly (so I put a size label on them--you can see the white tag hanging off the pocket).
So these were given to Church of the Redeemer in Bowie, MD This church has a ministry where they deliver these to a non-profit that then packs off the dresses and other items to orphanages in various parts of the world.   So once again, I was happy to re-use and recycle some pillow slips and put them to a good use.  

Tuesday, May 31, 2016

Images That May Influence Something I'm Making

Well, although I said I was going to use this blog for all the sewing and artsy-craftsy things I've been doing lately, I still take photos of stuff that catches my eye that I use for artistic inspiration or to spur my creativity.  Recently, inside the GAO building on H Street I noticed all the decorative embellishments all over the doors and walls. There's a castle of some kind of shiny metal on the marble walls that I think is used as a symbol by the Army Corps of Engineers. There's eagles in the parquet wood along the tops of the panelling in the elevators. And then on the elevator doors are stamped metal images of all kinds of American motif things, such as corn stalks bending in the wind.  I'm not exactly sure how these images are going to inspire or enhance my sewing or other projects but I think they all go into that vast visual imagery software in my brain and that somehow some of them will find a way to influence whatever I'm doing.


Old Towel Turned Into Kitchen Apron

Well, I haven't put much up here lately as I've been really busy busting through the fabric pile and finishing several big scale sewing projects. One of the smaller, quicker projects was a re-cycle or re-use of part of a green towel that got frayed out on one end and was really raggedy and headed for the landfill. But no, I just had to turned the untorn half into something useful. So I hacked off the torn up part and made it into an apron using some left-over green bias tape to make the ties more interesting and to bind the pocket. I always put pockets on my aprons for cell phone or keys or candy or something.  I've already used this green towel apron a lot, hence the stain on it already! But it's totally washable as it's an old towel!

Sunday, November 1, 2015

Wreath Made of old Rags and Fabric Scraps

This wreath is made completely out of scrap materials, including the frame made of twisted wires braided together. I tied on loads of ribbons made from little pieces of fabric left over from other sewing projects. For instance, since I've lost about 25 pounds in weight over the past 18 months and gone from a size 10 to a size 4 (!), I've had to take in the side seams on many dresses, tops and blouses over these past two seasons. In some cases, there are hems I've had to cut off also as skirts have gotten shorter lately or I've had to hack and trim to make things proportional. Other fabric pieces are just left-overs from some other sewing projects as I bust through my fabric stash making pillows, blankets, cloths, bags, table napkins, and children's clothes.  I don't even hem or finish the scraps for this wreath, I just make sure they are long enough to at least knot once around the wire frame. Now it's finished this wreath is hanging up in the kitchen but I'm thinking of putting it on the front door later in December as the colors seem kind of wintry.  I suppose I could add some Christmassy things to it -- maybe some shiny silver baubles I recently made by spray painting used light bulbs, or a big red ribbon -- but I'll think about that. But it's nice to make use of some fabric bits that would otherwise have ended up in landfill. And I can still keep tying bits of fabric over what's already here and change it's colors that way.  Sort of a continuous wreathing project..... And I move it around a bit.  This week it's hanging on the back of the kitchen door.