Welcome to my blog!

I used to blog here mostly using local photos about my neighborhood or Washington DC or other places I visited. But over time I found myself blogging about crafts or sewing projects or my activities as a seller of collectibles on Ebay (look my stuff up under Mugsim7) or other topics, such as selling my beautiful old Victorian townhouse. Occasionally, I take a break from blogging so you won't see anything regularly. But I'm still have fun writing it. May your days be blessed with miracles, and creativity too!

Friday, December 11, 2015

Kleenex Box Make-Over for Advent

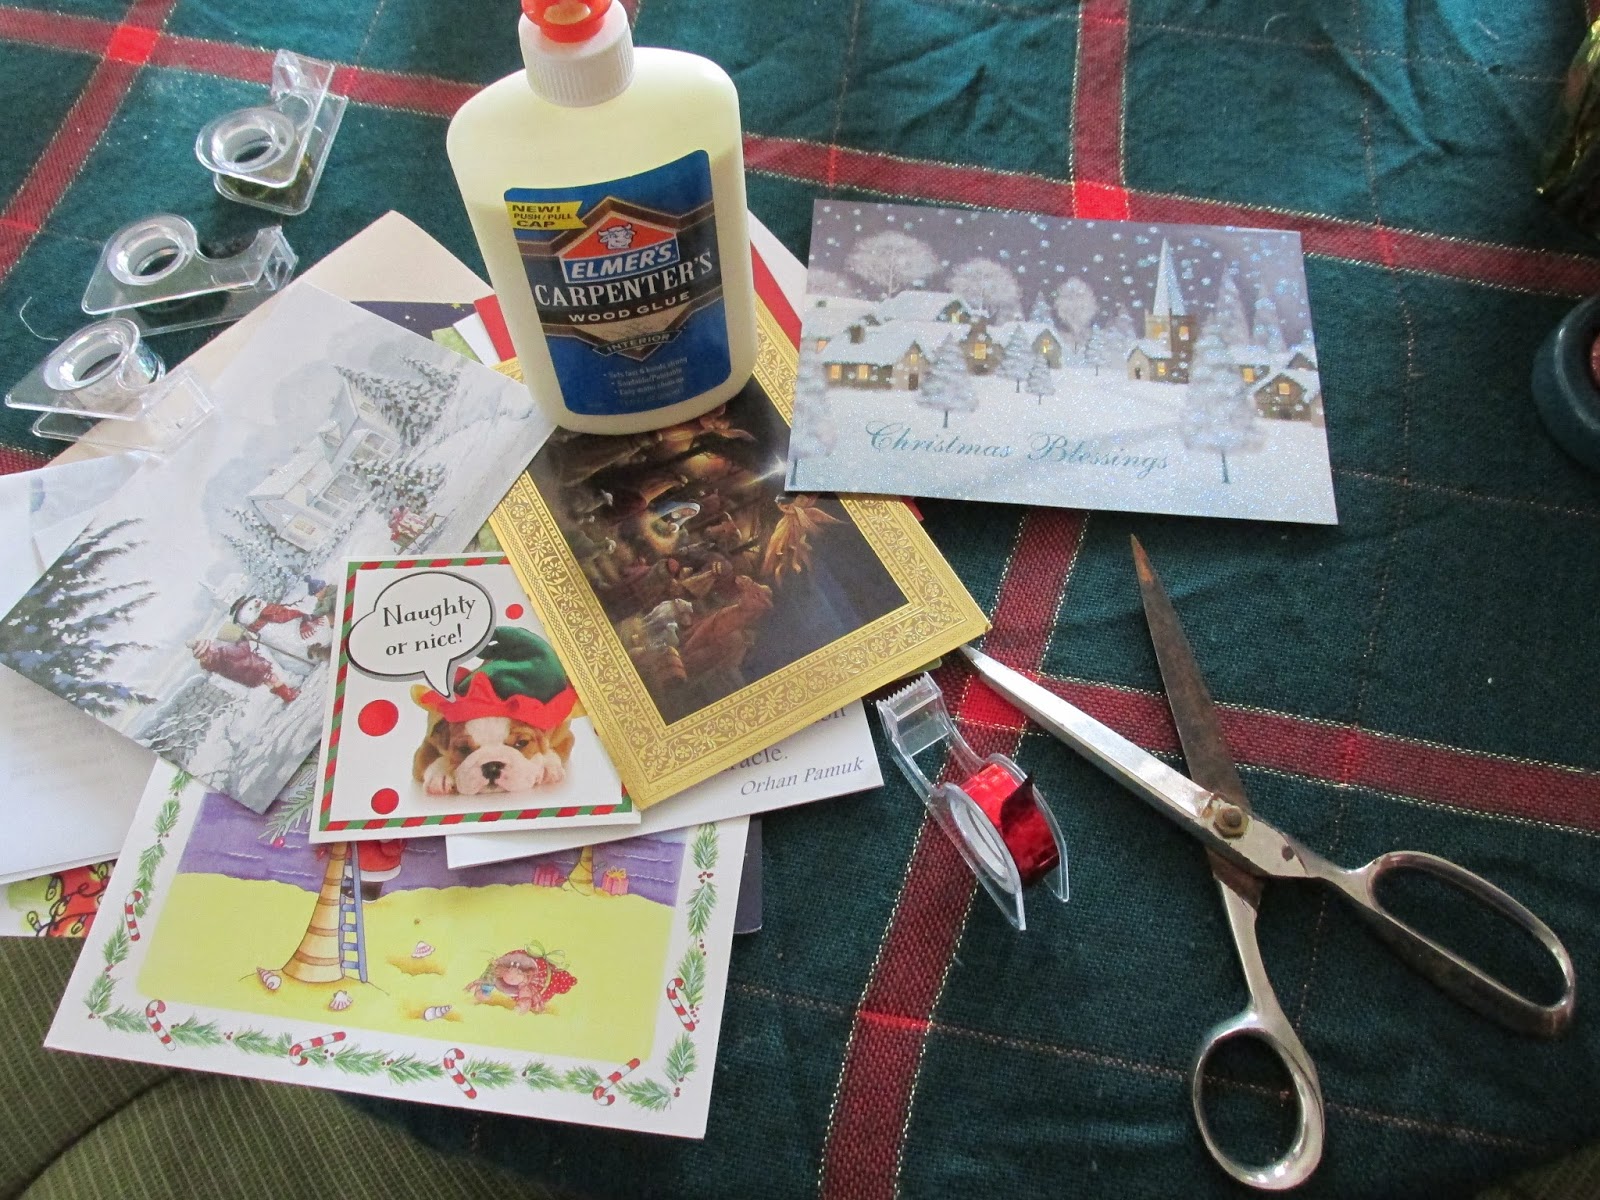
This was a quick make-over of a Kleenex box that had autumnal images on it and just didn't look good now that it's Advent. So I found the Christmas cards from last year and said "hmm what can I do with these rather than THROW THEM OUT AND HAVE THEM END UP IN LANDFILL?" So I cut out some of the images to fit the sides of the kleenex tissue box and glued them down with some Elmer's glue that needed using before it dried out. Then, since I'd snapped up some shiny tape from the Dollar Store, I used that to trim the rough edges of the box. And eh, voila! A decorated tissues box from ole stuff. All it took was used cards, glue, scissors and some tape.   If only 15 minutes like this every day could help with re-use, reduce and recycle of everything else......


Saturday, November 7, 2015

Cheapo Chalkboard for the Kitchen

Inspired by all the chalk paint projects on Pinterest, I decided we needed to have a blackboard in the kitchen for lists and notes and stuff.  So I picked up a cardboard-backed picture at a Salvation Army thrift store for $4.99 and lugged it home. After giving it a good clean -- and it was very dusty -- I took apart the picture from the frame, pulling out the very old and rusty nails that held the picture to the frame. After re-gluing the frame corners with E6000 super glue as they too were on the old and rickety side,  I then sprayed several coats of some left-over green paint on the frame, letting them dry overnight. Then using the spray chalkboard black paint I coated the picture over several times, during the course of several days, letting them dry overnight. All of this I did outside as the fumes were plentiful. I then re-glued and tacked the image back into the frame and hung it up in the kitchen for our use. The hardest part of this project was hanging this at the right height so we could easily write on it without it wobbling about!  It's great to have a chalkboard in the kitchen for shopping lists, notes, etc.

Sunday, November 1, 2015

Wreath Made of old Rags and Fabric Scraps

This wreath is made completely out of scrap materials, including the frame made of twisted wires braided together. I tied on loads of ribbons made from little pieces of fabric left over from other sewing projects. For instance, since I've lost about 25 pounds in weight over the past 18 months and gone from a size 10 to a size 4 (!), I've had to take in the side seams on many dresses, tops and blouses over these past two seasons. In some cases, there are hems I've had to cut off also as skirts have gotten shorter lately or I've had to hack and trim to make things proportional. Other fabric pieces are just left-overs from some other sewing projects as I bust through my fabric stash making pillows, blankets, cloths, bags, table napkins, and children's clothes.  I don't even hem or finish the scraps for this wreath, I just make sure they are long enough to at least knot once around the wire frame. Now it's finished this wreath is hanging up in the kitchen but I'm thinking of putting it on the front door later in December as the colors seem kind of wintry.  I suppose I could add some Christmassy things to it -- maybe some shiny silver baubles I recently made by spray painting used light bulbs, or a big red ribbon -- but I'll think about that. But it's nice to make use of some fabric bits that would otherwise have ended up in landfill. And I can still keep tying bits of fabric over what's already here and change it's colors that way.  Sort of a continuous wreathing project..... And I move it around a bit.  This week it's hanging on the back of the kitchen door.

Monday, October 26, 2015

Easy Peasy Pencil Pen Scissor Holder

This little project took me almost no time at all, except for the paint drying part. It starts with a nuts can -- cashews, peanuts, mixed nuts come in this packaging. Once you've eaten the nuts (!) rinse and dry out the can. Take off the plastic lid and spray paint the can with whatever leftover colored paint you have. I used the apple green left over from some other projects. While the paint is drying, punch half a dozen slits in the plastic lid with a scissors blade and then cut across them to make X-shaped openings into which you will push pens, pencils, scissors, etc.   Once the paint is dry, you can decorate the outside of the can however you like -- in this case I had some gold-colored duct tape (an amazing product you should snap up every time you see it on sale in the Dollar Store or a hardware store).  I then weighted the can with some stones and put the lid on it and stuck in the pens and pencils.  Hey presto change, another item kept out of the landfill and made useful in my kitchen through recycling and re-use.


Wednesday, October 21, 2015

Transforming Cargo Pants into Small Cargo Bag

There seem to be a lot of jeans in the fabric stash, so once again I stitched together a bag using an old pair of my son's khaki cargo pants that were horribly worn in the knees and way too small for him.  I just hacked off the pieces that had the wonderful big pockets on them and made those the sides of the bag after opening up the pant seams and stitching two big pieces together.  I then made a strap out of the rest of the leftover fabric and found another piece of fabric in my fabric stash to make a lining. This fabric was something I'd hacked off the bottom of a pink dress that I had remade into a shorter version -- you can tell I hang onto all kinds of bits of fabric!  I then embellished this bag with some brown grosgrain ribbon left over from some other project and stitched in some Velcro snaps in the top so the bag could be closed. And, hey presto chango, I had a small cargo bag.  Now, this became a gift to my sister who thought it very useful to carry all those extra things she wants to take to work with her, like shoes, or make-up or lunch.  She noted that the outside pockets were great for cell phones or keys.  I said "the whole thing is washable too!"  I just love hacking through my fabric stash with these types of useful recycling projects!
Pink floral lining and Velcro "snaps" at top of bag

Spray Painting Trash Into Treasure

Several months ago I picked out of the trash from the alleys around here a little round wooden table and a plant holder. I've been hanging on to them and nearly threw them back out again (nope, I'm not one of them TV hoarders!) except I got some pink spray paint recently on sale ($2 a can!) and just knew what to do with it. After a quick wipe down, over about three days I spray painted these items outside with about three coats of paint, letting them dry overnight.  I put these items out on my front porch to join the other colorful chairs and plants there.  I'm quite happy about this recycle-reuse activity as I really did need a little table on the porch for cups of tea and cookies and that plant really did need someplace to belong other than the floor. That's the trick to not being a hoarder, you just have to do something with it right away! 

Turning Almond Milk Bottles Into Candlesticks

Inspired yet again by all the arty crafty things I see on Pinterest, I decided to do something with the shapely almond milk plastic bottles I seem to accumulate. So I stripped off the plastic labels from three Califia almond milk bottles and took them outside to paint them with some silver spray paint I'd recently acquired for $2 at a going-out-of-business sale at a nearby hardware store (Brookland True Value) and that was leftover from another project (spray painting used light bulbs as Christmas ornaments). Over a couple of days I did about two coats of this nice shiny silver spray paint on the bottles.  I then inserted some plastic candle holders I'd kept from a floral centerpiece that someone had once given me (yes, you can find a use for all those bits and  pieces you are hoarding!) and after also spraying them silver, put some bright orange candles in them. The candles I got at T.J. Maxx on sale, ten for $4!  I also weighted the bottles with some stones on their insides so there'd be no tipping over! Two of the candlesticks  I put next to my fall floral display in the dining room and the other one got a bit more gussied up with a green ribbon and silver paint sprayed fake flower for a kitchen shelf. I'm quite happy with these ornaments and know I can change out the colors, candles and embellishments once Christmas, Easter, St. Valentine's Day, or a birthday comes along. Who'd have thought painting ole plastic bottles and keeping them out of the dump could be so fun?

Monday, September 21, 2015

Pillow from scrap fabric


When no longer needed, I think baby blankets make useful fabric pieces to make into other things and this fuzzy blue giraffe blanket just begged to be made into a soft pillow.  First, I embellished one side with some left over brown satin ribbon from the stash pile of fabric and findings that accumulates each time I do a clear-out of a closet or drawer.  I used brown ribbon as this blue pillow was to be paired with another pillow, also brown.  Putting right sides together, I then stitched three and a half sides, leaving half a side open for later insertion of the pillow stuffing.  After turning to right side out, I squeezed in the pillow stuffing (acquired on sale at in Walmart), then hand-stitched the opening and lo and behold, had another cute pillow for my son's bed. This project took hardly any time at all as I did the laundry at the same time, making for a very productive Monday morning.

Wednesday, September 16, 2015

Embellishing Old Blouse For More Use


After stitch witchery
Determined to use up some bits of old white and black lace and a shiny ornament, I went into my closet to see if there was some blouse or shirt that could use some embellishment to get me to wear it again. I found a somewhat worn white and grey printed blouse that I hadn't worn for two years and thought this was a good candidate for some scraps. It turned out I had just enough bits and pieces to make a fairly pleasing square shape out of the strips of lace. I stitched them on with the machine but hand-stitched the metallic diamond shape as I might have damaged it with the presser foot.  I think it came out all right and I've worn this a few times this summer and got some use out of something I might otherwise have cut up into rags or something.
What blouse looked like before

Blue jean pocket becomes charging station for wireless phone


Inspired by all the crafty stitch witchery on Pinterest boards, I ripped off a pocket from an old pair of blue jeans and turned it into a little hanging bag for re-charging of my wireless phone.  This was a simple 20 minutes or less craftie and I like how it came out. When I ripped the pocket off the blue jeans I left about 3/8" of fabric around the pocket that I then turned over with some iron-on seam fabric to finish the back and give it a little stiffness. For the hanging handle, I just used a thick seam from the outside leg of the pants and stitched it to the back of the pocket. All I had to do was locate a cup hanger and screw it into the wall to get this craftie done.  I'm quite pleased with it since I now can hang the wireless phone for re-charging at a plug that doesn't already have half a dozen other things plugged in.


Turning a Square Scarf Into an Infinity Cowl Neck Scarf

Red floral cowl scarf laid out
Finished square scarf next to original red cowl
34"x35" square scarf beside red cowl
Pin sides before cutting
There's a couple of large square scarves in my closet that have been hanging in there, quite useless, for a while.  The trend now is for infinity or cowl neck scarves so I thought I'd convert the square ones. This turned out to be far easier than I thought and I was able to stitch up a couple of these in two hours. First I found the red floral cowl scarf I owned already, to use as a pattern or model. I saw right away that the square scarf just needed to be cut into two halves that I could then stitch together to make the cowl.  So after cutting, putting right sides together, I stitched it together and then stitched the bottom to make it a loop.  I then roll hemmed the long "cut" side of the scarf. Since the square scarf came with finished edges, there was not a lot of other finishing to be done to the seams. I'm quite pleased with the end product and quickly turned another big 35" by 34" printed square scarf into a cowl neck scarf as well. So now I'm ready for fall!
Square scarf cut in half

Roll hem on long side
other square converted to cowl

Sunday, September 13, 2015

Zippered Bag Made from Old Blue Jeans and Scrap Fabric

Determined to bust through some of those blue jeans sitting in my fabric stash awaiting re-use and recycling, I ran up this zippered bag on the sewing machine last month. It's your basic blue jean bag made out of the top of a pair of elasticized waist pants, added a zipper and lining with pockets and put on a shoulder strap. I just cut off the pants legs and stitched two pieces together after re-seaming the curved seams into straight seams. Before adding the lining, I stitched on a couple of floral scrap fabric pieces to decorate it a bit.  I made a complete other bag to insert as a liner and which included some pockets and pouches. The liner was also made of some scrap fabric I'd accumulated. The lining's interior pockets and pouches were cut right out of other fabric from my recycle stash. So they just were stitched into or onto the lining.  I also had an unused heavy zipper and put that across the top to make this bag closable and more usable. The shoulder strap was also just another piece of blue jeans from the legs, just cut and stitched into a long ribbon and then turned right sides out before stitching into the bag between the lining and bag exterior.
This bag has become a great extra travel bag for us as it's squishy and fits on the plane floor or in the bus or train overhead bin easily.  We've used it for all kinds of things like snacks and medications, or suntan lotion, or books and papers, you know, that stuff you just gotta carry with you that you don't want to check or pack in your fancy suitcase. And it's washable!


Little Girl's Pillowcase Dress

I'd read about making a little girl's dress from an old pillowcase on Pinterest and other websites so I decided I just had to try one and it came out all right, don't you think? I found a pillowcase in the closet that didn't seem to have a mate -- another one of those things that disappear in the laundry. Once I figured out the heavy end seam was the bottom of the dress, I then cut along the top and cut out the arm holes.  I quickly trimmed the armholes and then turned over the top with a large seam that could hold a ribbon.  Since I'm working on busting through my bag of scrap fabrics, I found this rather pretty pink satin fabric that was once the lining to a jacket, and stitched into a long tube that became the ribbon. I then threaded this ribbon through the top seam and eh voila, pillow case dress! I added on a little pocket using the leftover fabric from the arm hole cut out and stitched it as a patch pocket right onto the dress, using some pink zigzagging as decoration.
Overall, I was quite happy with how it came out and was very pleased when a little 7 year old girl came by and when I showed it to her she said she wanted it!  I adjusted the tie ribbon for her height and she said she was going to use it as a night dress!  I am so pleased to have done this project but just a little miffed with myself for not taking of photo of the little girl in the dress, er, nightgown!


Friday, September 4, 2015

My Trusty Powerless Kitchen Tools


serrated knife
carpet sweeper
meat thermometer
can opener
funnel
Since I've already blogged about my Trusty Kitchen Appliances, that is, the stuff that works with electricity that I use all the time in preparing food and cooking, I decided to look at all the kitchen tools I rely on to get things done, that is, the tools that don't need electricity. So here's the list: a serrated knife, oven thermometer, a funnel, a carpet sweeper, a garlic press, a measuring jug, a gravy separator, a small sieve, can opener, spatula and spoon, roast potato nail, and timer. I expect there's a few other things but these are used the most and seem to me to be the most useful non-electricity-using items that I use over and over again.
What got me thinking about these items was our visit to a museum last year where they showed a lot of items that were used in homes and yards a hundred years ago. What was startling was that in several cases, they simply didn't know what the device was for or how it was used.  I'm sure everyone knows how everything in this blog works, but what about a hundred years from now? Will there still be manual can openers? Hand pushed carpet sweepers? Will anyone still use potato nails or garlic presses? And surely spoons, spatulas and sieves will still be in use?  Or will it be the case that in about 20 years from now I will look at these items and say, "Gor blimey, what did I use that thing for?" Or "whatever happened to that gravy separator?"

potato nail
garlic press


gravy separator

sieve


Pyrex measuring jug

spoon and spatula